Row of separate raised flower beds or planters, or vegetable boxes. Compost fill. Edged with wooden railway sleepers. Domestic back garden.

If you want productive beds ready for spring planting, February is the month to get a sleeper raised bed in the ground. The soil is starting to wake up, materials are easier to get hold of, and you can work at your own pace before the main gardening rush kicks in.

In this guide, we look at why February is such a good time to build, how to choose between treated softwood and green oak sleepers, which fixings to use, and how to fill your bed so it performs for years.

Why Is February The Best Time To Build A Raised Sleep Bed?

February sits in that useful gap between winter shutdown and spring growth. You are not battling summer heat, and you still have time to prepare soil before planting.

A February build works well because:

  • Ground conditions are usually workable - Frost is less frequent in many parts of the UK, but the soil is still moist enough to level and compact easily.
  • You are ahead of the planting season - Most vegetable seeds and bedding plants go in from March and April onwards. Building now gives the soil a few weeks to settle and allows you to tweak levels and layout before you sow or plant.
  • Materials and labour are easier to schedule - Trade diaries and delivery slots fill quickly from spring. Getting your sleepers, screws and brackets sorted in February helps avoid stock shortages and last minute changes.
  • You can work with the weather - Short, dry spells are ideal for sleeper work. You can cut and fix timber on one day, then come back another day to line and fill the bed.

If you are planning more than one bed or a whole run of landscaping work, starting in February spreads the workload nicely into early spring.

Which Sleepers Should You Choose For A Raised Bed? 

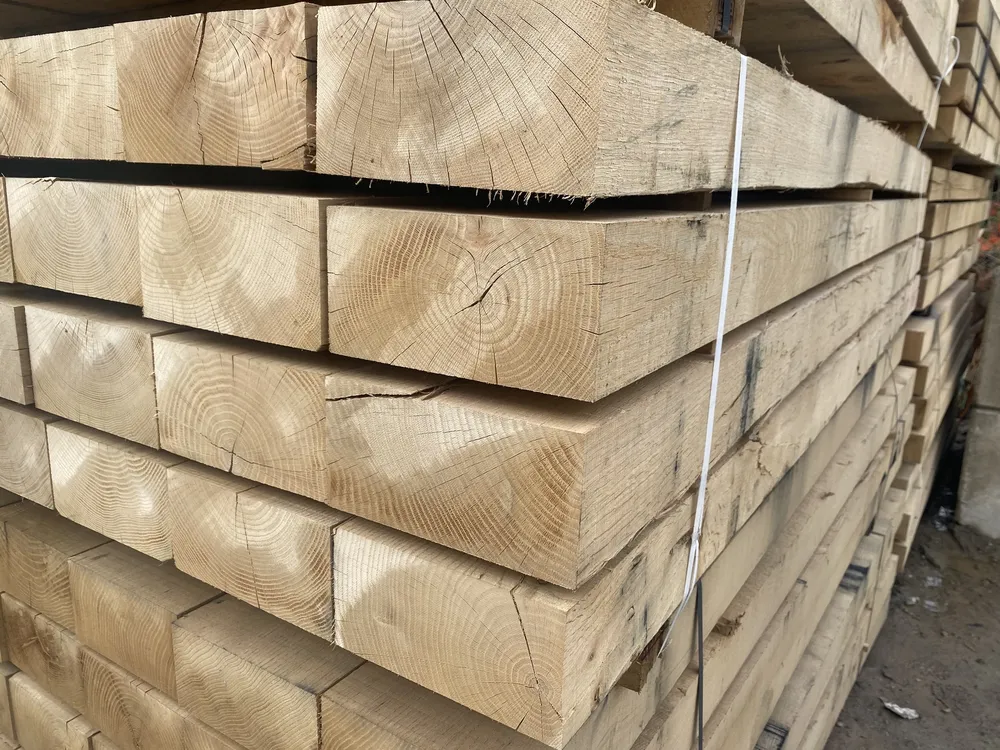
The right sleeper choice makes the difference between a bed that lasts a couple of years and one that stays solid for a decade or more.

Treated Softwood Sleepers

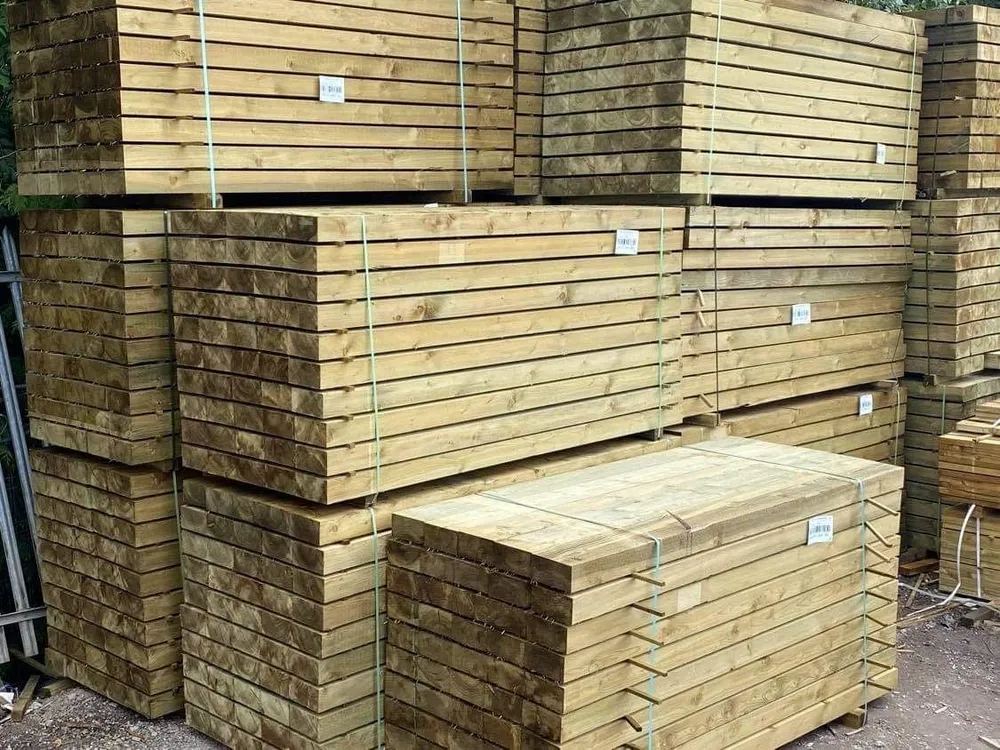
For most gardens and domestic projects, sawn treated softwood sleepers are the practical all-rounder. Our sawn treated sleepers are pressure treated to a class suitable for ground contact, helping them resist rot, decay and insect attack in raised bed applications.

They are a strong option if you want:

  • A cost effective solution for multiple beds
  • Sleepers that are lighter and easier to handle than hardwood
  • A clean, modern look that can be stained or left as is

Green Oak Sleepers

If you want a more natural, heavyweight feel, green sawn oak sleepers offer a very robust, long lasting option. Fresh sawn oak sleepers are widely used for natural landscaping projects, including raised beds, borders, terraces and walkways, thanks to their strength and durability.

They are a good fit when:

  • You like a rustic, characterful appearance
  • You are building retaining beds or higher structures
  • You want the extra weight to keep everything locked in place

New Sleepers vs Reclaimed

If you are intending to grow edibles, most current guides advise new sleepers rather than old creosote treated railway sleepers, as older treatments can be undesirable around food crops. New timber sleepers are also easier to cut, stack and secure.

In short:

  • Choose treated softwood for cost effective, easy handling beds
  • Choose green oak where you want maximum lifespan and a heavyweight, natural look

What Fixings Do You Need To Secure Timber Sleepers?

Raised beds are only as strong as the fixings you use. A good build relies on:

  • The right screws for timber-to-timber joins
  • Suitable angle brackets where you want extra reinforcement

Structural Screws for Sleepers

Standard wood screws are rarely long or strong enough for sleepers. A dedicated structural or landscaping screw gives you the pull-down power you need.

Our range of Timber In-Dex Screws are designed for professional timber construction, with a sharp tip for immediate bite and a self drilling option that removes the need for pre-drilling in most softwoods and many hardwoods. They also benefit from a high performance corrosion resistant coating for long term outdoor use.

Angle Brackets for Extra Strength

Corners and stepped beds benefit from mechanical reinforcement. A heavy duty galvanised angle bracket gives a clean, structural connection where two sleepers meet or where you are tying a bed into another feature.

Galvanised brackets are designed to resist corrosion outdoors and provide strong support in timber frameworks, making them ideal for reinforcing raised bed corners or internal braces.

Step By Step - How Do You Plan & Build A Raised Sleeper Bed?

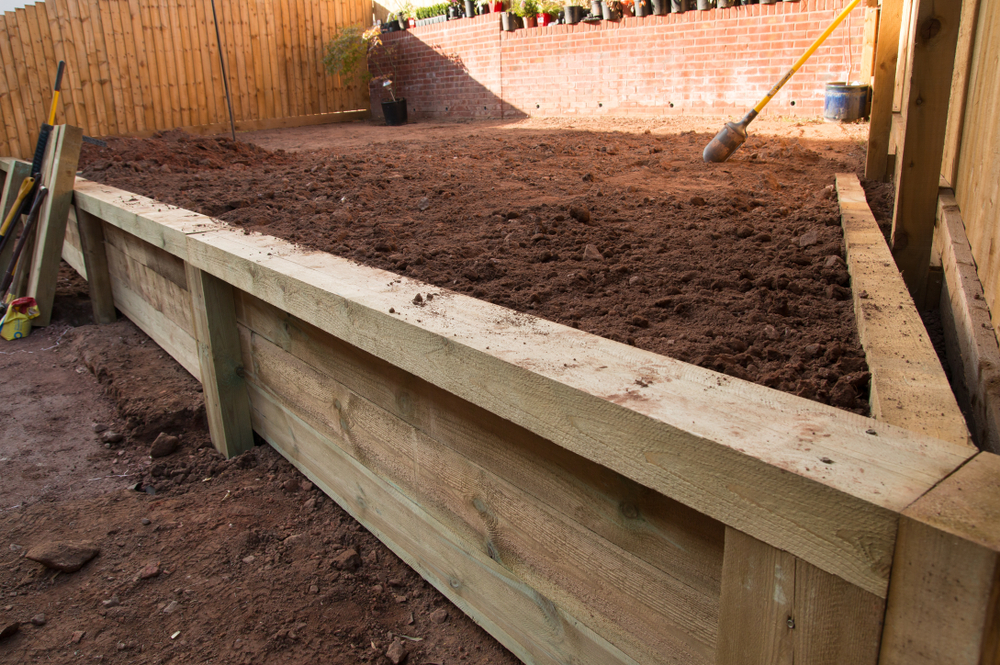
A simple rectangular bed is a good starting point and suits most gardens.

1. Decide on size and position

Think about:

  • Sunlight - Most vegetables and many flowers prefer a sunny position. Aim for at least six hours of light where possible.
  • Access - Beds should be narrow enough to reach the centre from either side, typically up to 1.2 m wide. Leave paths wide enough for a wheelbarrow or kneeling comfortably between beds.
  • Ground conditions - Check for decent drainage and avoid obvious wet spots where water collects.

Mark out the bed with string or line marking spray, and check it looks right from the house and main viewpoints.

2. Prepare the ground

  • Strip turf or surface vegetation inside the marked area.
  • Rake the base level, removing any large stones or debris.
  • For heavy or wet soils, add a shallow layer of compacted hardcore or gravel for drainage, particularly for deeper beds.

If you are building on hardstanding, make sure excess water has somewhere to run off.

3. Lay and fix the first course of sleepers

  • Set out the first course of sleepers in position. Check corners are square.
  • Use a long spirit level to check they sit flat. Pack any low points with compacted gravel or sharp sand.
  • Fix the corners together with long structural screws such as ForgeFast T Fix. Drive from the outside into the end grain of the adjoining sleeper.

For extra strength, add internal galvanised angle brackets at each corner and secure them with suitable screws.

4. Build up the height

Most raised beds use between one and three courses of sleepers:

  • One course is enough for low flower borders or edging.
  • Two courses give a working height that suits most vegetable beds.
  • Three or more courses work well for taller retaining beds or accessible beds for those who prefer not to bend.

As you add each course:
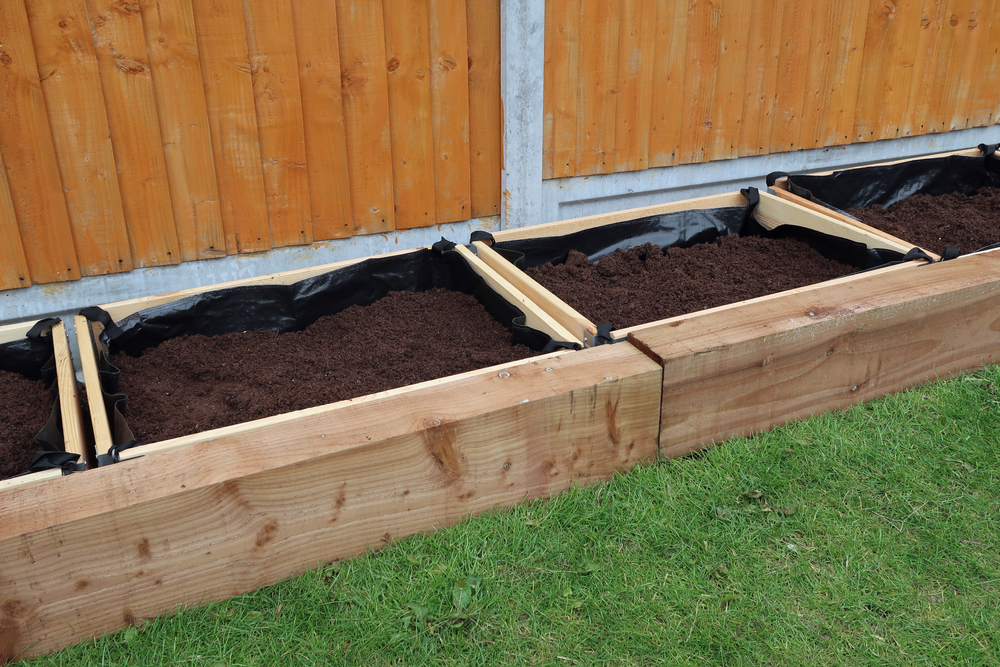
  • Stagger joints where possible, similar to brickwork, for extra strength.
  • Pull each sleeper down tightly to the one below using structural screws driven from above, or use timber dowels if preferred.
  • Check levels regularly so the bed does not twist out of square.

5. Optional lining

Lining is not essential, especially with modern class 4 treated sleepers, but some gardeners like to line the inner face with:

  • Heavy duty landscaping fabric to keep soil separate from the timber
  • Permeable geotextile to allow moisture movement while holding soil back

If you line the bed, make sure:

  • Water can still drain freely at the base
  • The fabric is fixed neatly so it will not snag when you fill the bed

What Should You Fill A Sleeper Raised Bed With?

Filling makes or breaks a raised bed. You are aiming for a structure that drains well, holds moisture and provides long term nutrition.

Most expert guides recommend not using heavy garden soil alone, as it can compact in a raised bed and reduce drainage. Instead, use a layered or blended approach.

Building Up The Fill On A Budget

For deeper beds, you do not need premium compost all the way down.

You can:

  • Use rough organic material such as branches, hedge trimmings and untreated timber offcuts in the bottom third
  • Add a layer of inverted turf or semi rotted compost above that
  • Finish with a good depth of quality topsoil and compost mix in the top 250 to 300 mm

This approach:

  • Saves on material costs
  • Improves drainage
  • Encourages soil life as the lower layers break down over time

What Mix Should You Use In The Top Layer?

For general vegetable and flower growing, a reliable mix is:

  • Around 60 percent topsoil
  • Around 40 percent organic matter, such as peat free multipurpose compost and well rotted manure

Adjust as needed:

  • Add extra grit or sharp sand for Mediterranean herbs and drought tolerant plants
  • Add more organic matter for hungry crops such as courgettes and brassicas

Once filled, water the bed thoroughly and allow it to settle for a week or two. Top up with additional compost if the level drops.

Key Takeaways & Next Steps

A sleeper raised bed built in February sets you up for a productive, low maintenance season:

  • You get the structural work done before the garden gets busy.
  • Treated softwood sleepers give a cost effective, easy handling solution for most beds, while green oak sleepers provide maximum durability and a natural finish.
  • Structural landscaping screws such as ForgeFast T Fix and heavy duty galvanised angle brackets create strong, long lasting joints that stand up to weather and repeated use.
  • A layered fill and quality topsoil / compost mix will keep plants growing strongly for years.

If you are planning a raised sleeper bed this month, our team at KPT Timber can help you match sawn treated sleepers, green oak sleepers, suitable angle brackets and ForgeFast T Fix screws to your layout and soil conditions. Share your measurements and we can advise on sleeper quantities and fixings so you can get the job done cleanly and confidently, whether you are a homeowner, landscaper or builder.

Sources:
https://www.rhs.org.uk/garden-features/how-to-make-a-raised-bed, https://www.gardenninja.co.uk/beginners-guide-to-raised-beds/ , https://www.wickes.co.uk/ideas-advice/raised-sleeper-bed
https://www.jacksons-fencing.co.uk/the-edit/how-to-build-a-raised-garden-bed-with-sleepers
https://www.haldane-fisher.com/blog/post/how-to-build-raised-beds-with-sleepers